Integration via Widgets
This guide explains how to integrate Osigu Prescribing's ePrescription widget into your website quickly and easily.
This implementation requires registering medical specialists who can issue prescriptions on your site.
We provide a simple implementation solution for doctor registration and prescription processes, detailed below.
General Information
For each widget, you must follow these steps:
Osigu JS Library
First, include the corresponding widget library in the header section of your webpage.
<!DOCTYPE html>
<html>
  <head>
    <script type="text/javascript"
    src="https://the-widget.widgets.osigu.com/sandbox/0.0.9/widget.js">
    </script>
  </head>
  <body>
    <!-- Your content goes here -->
  </body>
</html>
Widget Instance
The next step is to create an instance of the widget on your page. This will display the widget in the designated area of your page with the appropriate tags and expected behavior.
Each widget has its specific initialization parameters, but there are some general parameters described below:
| Name | Type | Description | Req. |
|---|---|---|---|
| containerId | String | The HTML tag ID where the widget will be displayed. | Yes |
| clientId | String | The client ID is provided to integrate our widgets. | Yes |
| clientSecret | String | A key is provided alongside the client ID. Together, these generate an authorization token. | Yes |
| locale | String | Specifies the widget's language and regional display, e.g., es for Spanish, en for English. | No |
| primaryColor | String | Hexadecimal color code is used as the primary color. | No |
| secondaryColor | String | Hexadecimal color code is used as the secondary color. | No |
| errorColor | String | A hexadecimal color code is used to display error messages. | No |
ColorsWidgets allow you to specify primary, secondary, and error colors. This ensures the widgets match your brand's color palette.
These parameters are optional. If not specified, the widgets will default to Osigu's standard colors.
Using the parameters mentioned earlier, you can initialize the widget as shown in the following example:
<HTML>
  <HEAD>
  </HEAD>
  <BODY>
    <script type="text/javascript"
    src="https://the-widget.widgets.osigu.com/sandbox/0.1.0/widget.js">
    </script>
    <noscript>
      <strong>We are sorry, but this site does not work properly without
        JavaScript. Please enable it to continue.</strong>
    </noscript>
    <div id="widget_container"></div>
    <script>
        TheWidget.createWidget({
            containerId: "widget_container",
            primaryColor: "#2fa6ff",
            errorColor: "#ee6f6f",
            clientId: "gt-test-third-party-application-slug",
            clientSecret: "9a1b783b-a5d5-4194-8d10-ba15906e3bb0",
            locale: 'es'
        });
    </script>
  </BODY>
</HTML>
Doctor Registration
To enable a doctor to issue prescriptions through our platform, certain details about the doctor are required to generate accurate electronic prescriptions. This includes digital seals, signatures, and electronic signatures.
This widget is designed for the host application to provide most of the medical professional's information. However, additional data will be requested through input fields in the widget, while the rest is supplied as initialization parameters.
In addition to the parameters outlined in the widget instance section, the registration widget requires the following parameters:
| Parameter | Type | Description | Req. |
|---|---|---|---|
| doctor.givenName | String | First name of the medical specialist. | Yes |
| doctor.middleName | String | Middle name of the medical specialist. | No |
| doctor.surname | String | Last name of the medical specialist. | Yes |
| doctor.secondSurname | String | Second last name of the medical specialist. | No |
| doctor.countryCode | String | Country where the specialist practices. | Yes |
| doctor.emailAddress | String | Email address of the doctor. | Yes |
| doctor.sex | String | Gender of the doctor. Accepted values: FEMALE or MALE. | No |
| doctor.salutation | String | Salutation for the specialist, e.g., Dr. or Dra. | Yes |
| doctor.medicalLicenseNumber | String | Medical license number, also known as professional ID or registration. | Yes |
| doctor.issuingInstitution | String | Institution where the degree was obtained. | Yes |
| doctor.taxIdentificationNumber | String | Tax identification number. | Yes |
| doctor.address | String | Doctor’s address, displayed on the generated prescription. | Yes |
| doctor.phoneNumber | String | Doctor's phone number, also displayed on the generated prescription. | No |
| doctor.timeZone | String | Doctor’s time zone, e.g., America/Guatemala or Europe/Madrid. | Yes |
| doctor.specialties | array[Object] | Array of objects containing additional details about the doctor’s specialties. | No |
| doctor.specialties[].name | String | Name of the specialty. | Yes |
| doctor.specialties[].issuingInstitution | String | Institution where the medical specialty was obtained (if required in the country). | No |
| doctor.specialties[].licenseNumber | String | License, registration, or certification number of the specialty (if applicable). | No |
Registration Widget Initialization
To install the registration widget, you need to include the library specific to this widget and provide the instance parameters, as shown in the following example:
<HTML>
  <HEAD>
  </HEAD>
  <BODY>
    <script type="text/javascript"
    src="https://doctorenrollment.widgets.osigu.com/sandbox/1.1.1/widget.js">
    </script>
    <noscript>
      <strong>Lo sentimos pero este sitio no trabaja apropiadamente sin
        JavaScript. Por favor habilitelo para continuar.</strong>
    </noscript>
    <div id="widget_container"></div>
    <script>
        DoctorEnrollmentWidget.createWidget({
            containerId: "widget_container",
            primaryColor: "#2fa6ff",
            errorColor: "#ee6f6f",
            clientId: "gt-test-third-party-application-slug",
            clientSecret: "9a1b783b-a5d5-4194-8d10-ba15906e3bb0",
            locale: 'es',
            doctor: {
              givenName: 'Juan',
              middleName: 'Francisco',
              firstSurname: 'Bassi',
              secondSurname: 'López',
              countryCode: 'GT',
              emailAddress: '[email protected]',
              sex: 'MALE',
              salutation: 'Dr.',
              medicalLicenseNumber: '2012-468',
              issuingInstitution: 'Universidad Francisco Marroquin',
              taxIdentificationNumber: '64578-K',
              address: 'Ruta 2, 4-71 Zona 4, Cuatro Venezia',
              phoneNumber: '(502) 4578-6581',
              cellPhoneNumber: '(502) 4929-0808',
              timeZone: 'America/Guatemala',
              specialties: [{
                name: 'Ginecología y Obstetricia',
                licenseNumber: '2016-547',
                issuingInstitution: 'Universidad de San Carlos de Guatemala'
              }]
            }
        });
    </script>
  </BODY>
</HTML>
Doctor Registration Workflow
With the example provided earlier, the widget will be initialized and perform the following operations:
- Obtains new credentials based on the provided
clientIdandclientSecret. - Checks if the doctor identified by the provided medical license number and country is already registered in the Osigu platform.
Doctor Not Registered
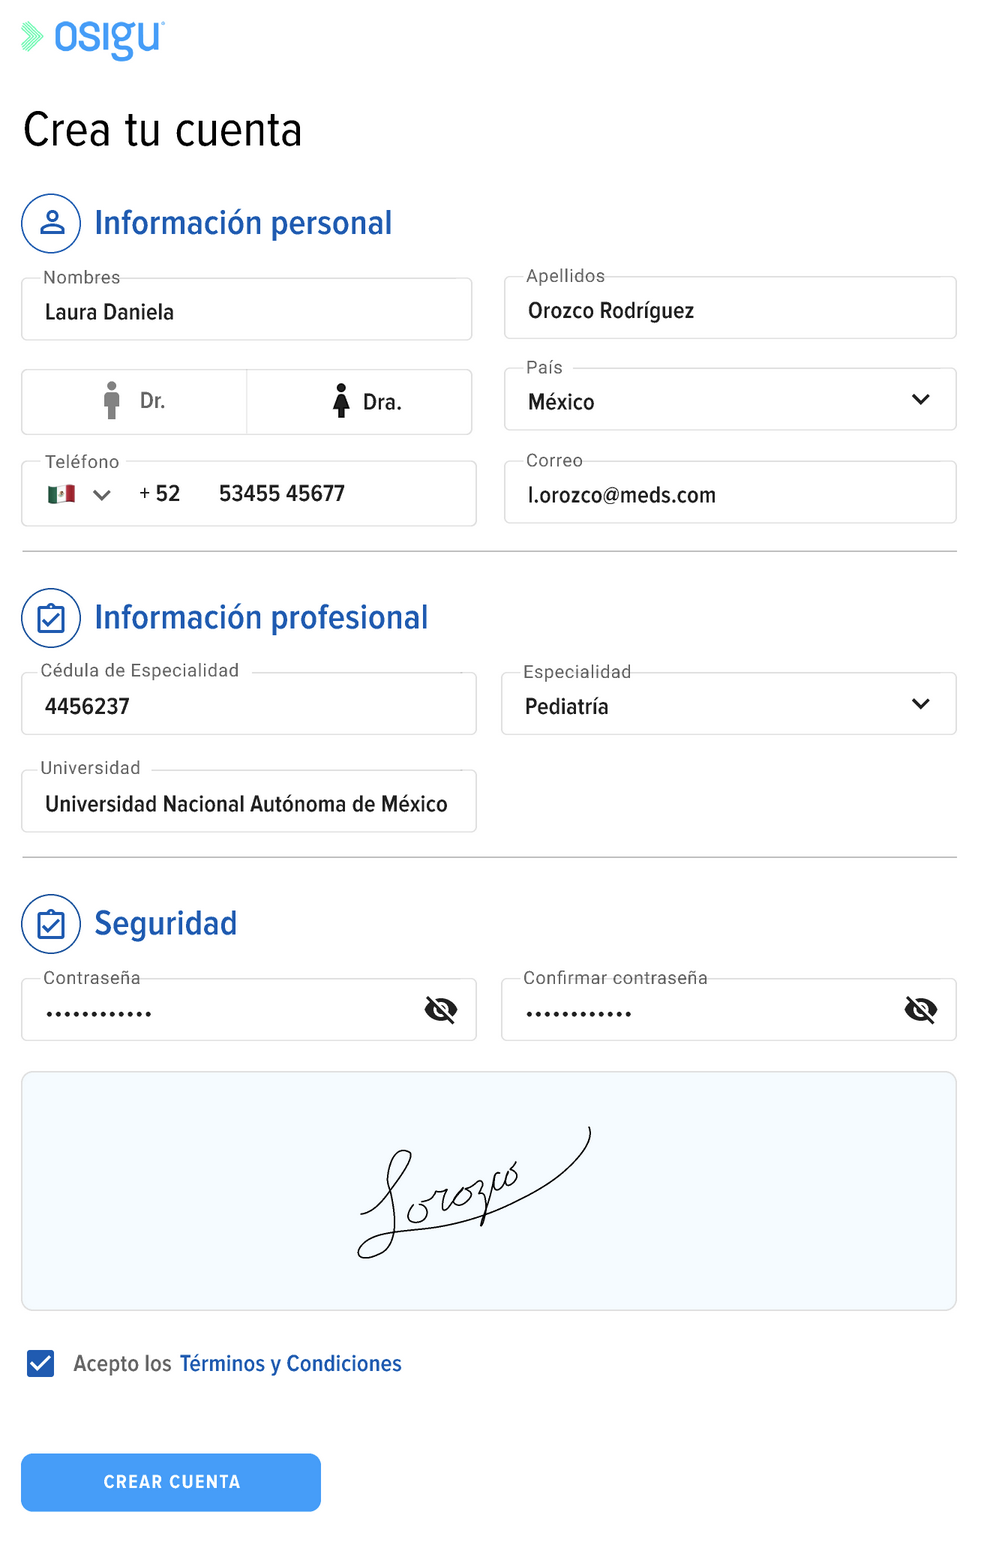
If the doctor is not yet registered on the Osigu platform, the widget will display a dialog similar to the following:

This dialog will guide the doctor through the registration process.
Additional Doctor Registration Steps
The doctor is prompted to create and confirm a password in the dialog displayed during registration. This password will be used for electronic signatures and to create a user account, enabling access to Osigu’s web platform. Doctors can manage their profiles and perform other administrative tasks on this platform.
Additionally, doctors can generate an image of their handwritten signature. While this is optional, the signature will be included in prescriptions for enhanced personalization and compliance.
When this information is saved, the widget emits an event to its web application container. The event is called onDoctorRegistered. It can be useful for tracking how many of your users have successfully registered on our platform.
onDoctorRegistered Event
onDoctorRegistered EventBelow is an example of how to capture and handle the onDoctorRegistered event. This event provides details such as the doctor’s primary medical license number and the country they belong to.
const container = document.getElementById('widget_container')
container.addEventListener("onDoctorRegistered", function (e) {
  console.log(e.detail.medicalLicenseNumber);
  console.log(e.detail.medicalLicenseNumber);
});
Registered Doctor
If the doctor is already registered in our platform, the Widget will display a message indicating their registration status.

ePrescription
Doctors who are already registered on our platform can generate prescriptions using our Widget. Below are the steps to initialize the prescription Widget.
Initializing the ePrescription Widget
To enable a doctor to create a prescription using our platform, the Widget must be initialized with the following additional parameters (in addition to those described in the Widget instance section):
| Name | Type | Description | Required |
|---|---|---|---|
doctor.medicalLicenseNumber | String | Medical license number of the doctor. | Yes |
doctor.countryCode | String | Country where the doctor practices. | Yes |
Below is an example of how to initialize the prescription Widget:
<HTML>
  <HEAD>
  </HEAD>
  <BODY>
    <script type="text/javascript"
    src="https://eprescription.widgets.osigu.com/sandbox/0.4.1/widget.js">
    </script>
    <noscript>
      <strong>Lo sentimos pero este sitio no trabaja apropiadamente sin
        JavaScript. Por favor habilitelo para continuar.</strong>
      <div id="widget_container"></div>
      <script>
        EPrescriptionWidget.createWidget({
            containerId: "widget_container",
            primaryColor: "#2fa6ff",
            errorColor: "#ee6f6f",
            clientId: "gt-test-third-party-application-slug",
            clientSecret: "9a1b783b-a5d5-4194-8d10-ba15906e3bb0",
            locale: 'es',
            doctor: {
              medicalLicenseNumber: '2012-468',
              countryCode: 'GT'
            }
        });
    </script>
    </noscript>
  </BODY>
</HTML>
This will display an instance of our ePrescription Widget in the designated container. The ePrescription Widget will perform the following tasks:
- Verify the validity of the access token.
- Obtain new credentials based on the provided
clientIdandclientSecret. - Check if the doctor identified by the provided medical license number and country is registered in our platform.
Unregistered Doctor
If the doctor is not yet registered on our platform, the widget will display the following message:

Registered Doctor
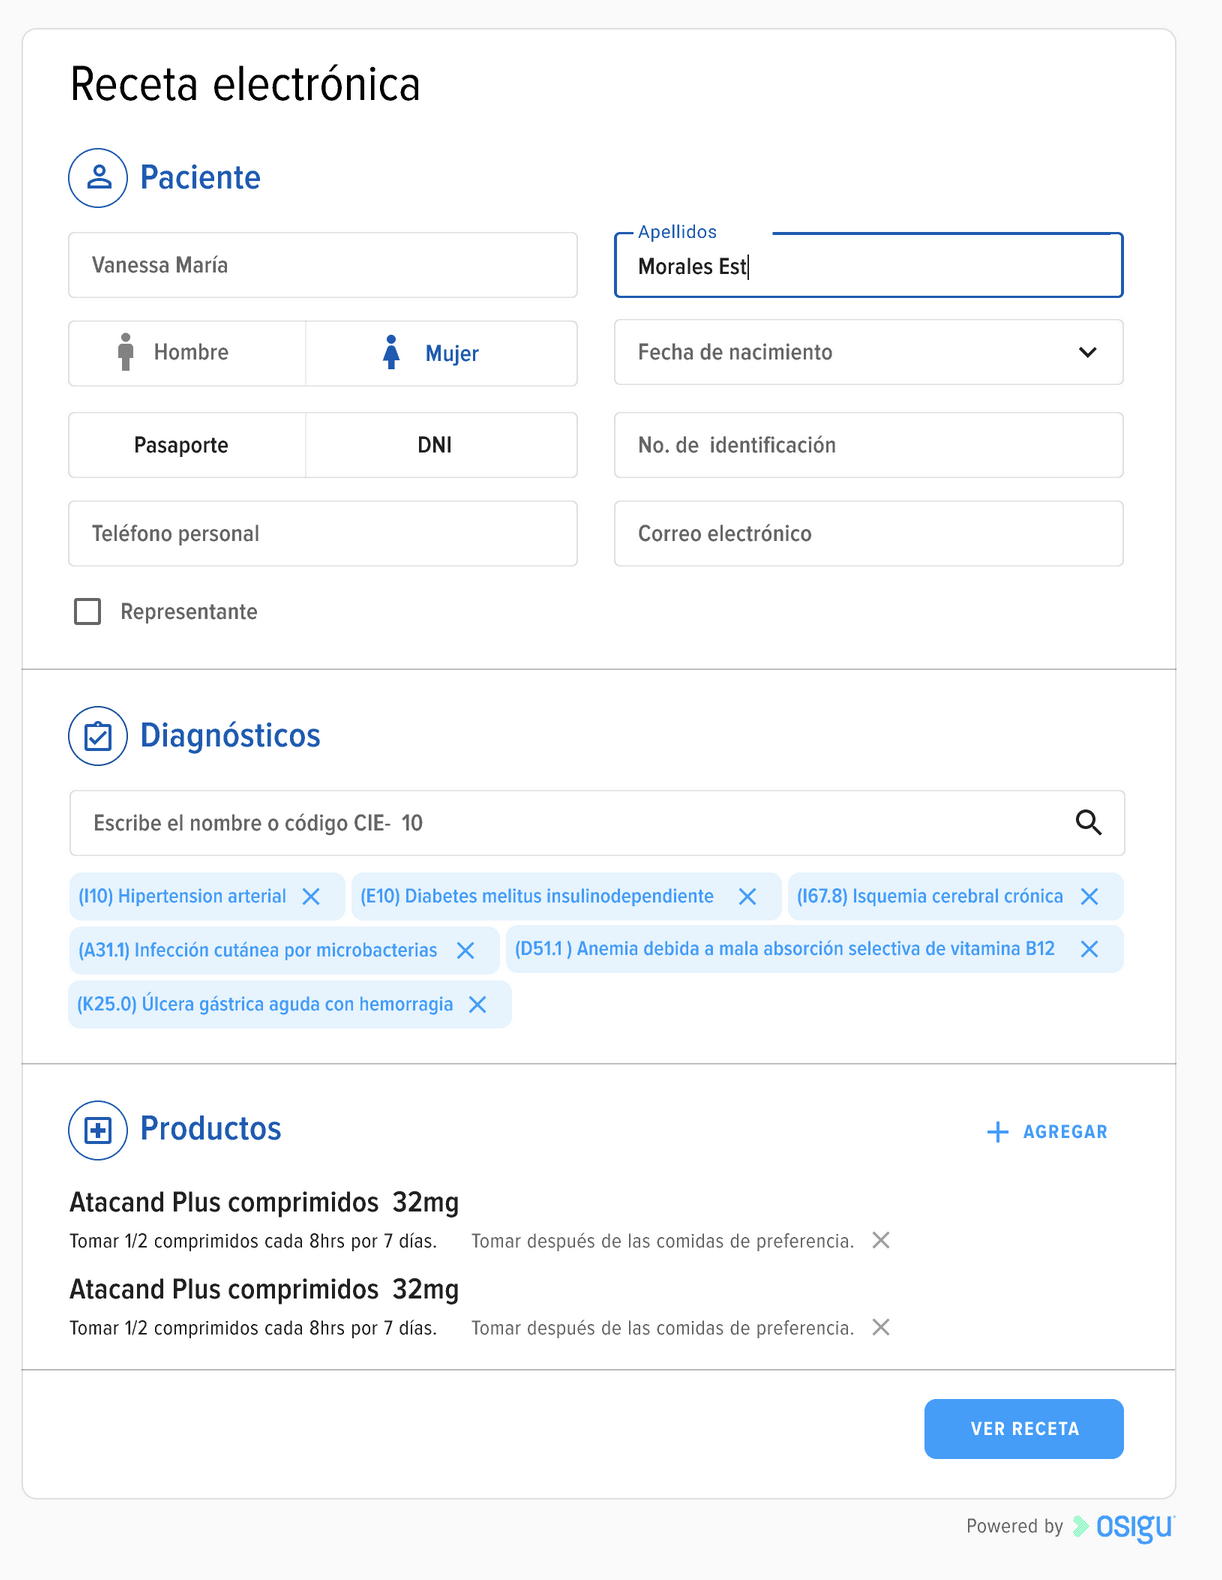
If the doctor is already registered, the widget will initialize as shown below:

The doctor will be able to perform the following actions:
- Enter patient information.
- Search and select diagnoses using our ICD-10 diagnosis catalog.
- Input medical treatments.
Adding Medical Treatments
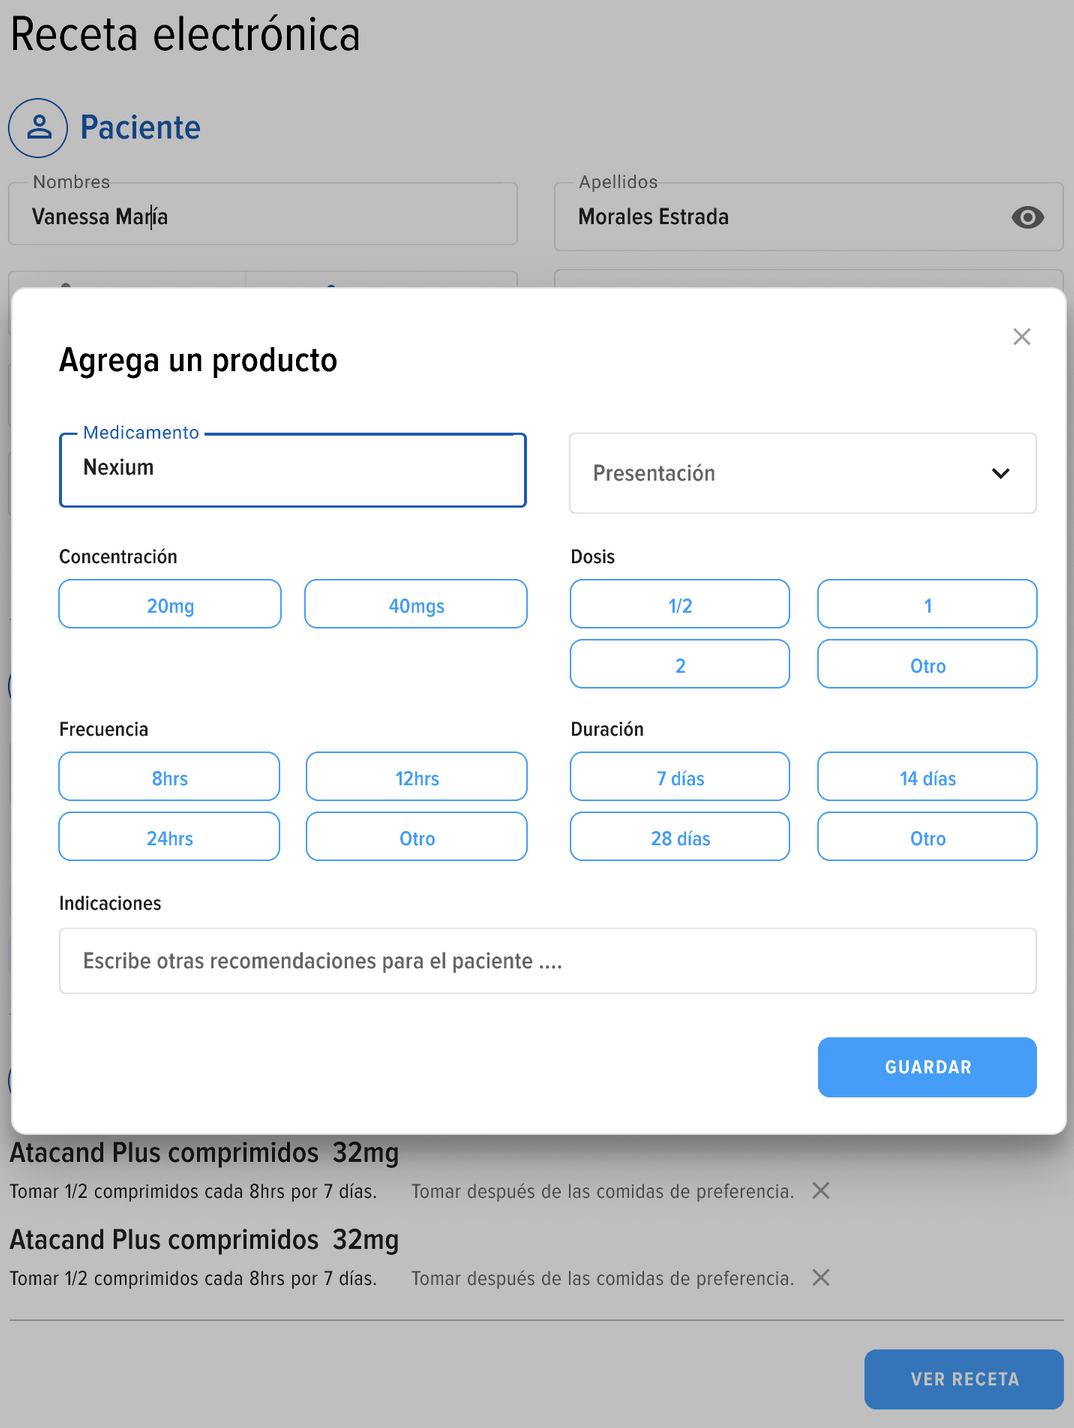
To input medical treatments, a modal window will appear, allowing the doctor to select the medication, presentation, dosage, frequency, and duration, as illustrated in the image below:

Prescription Preview and Finalization
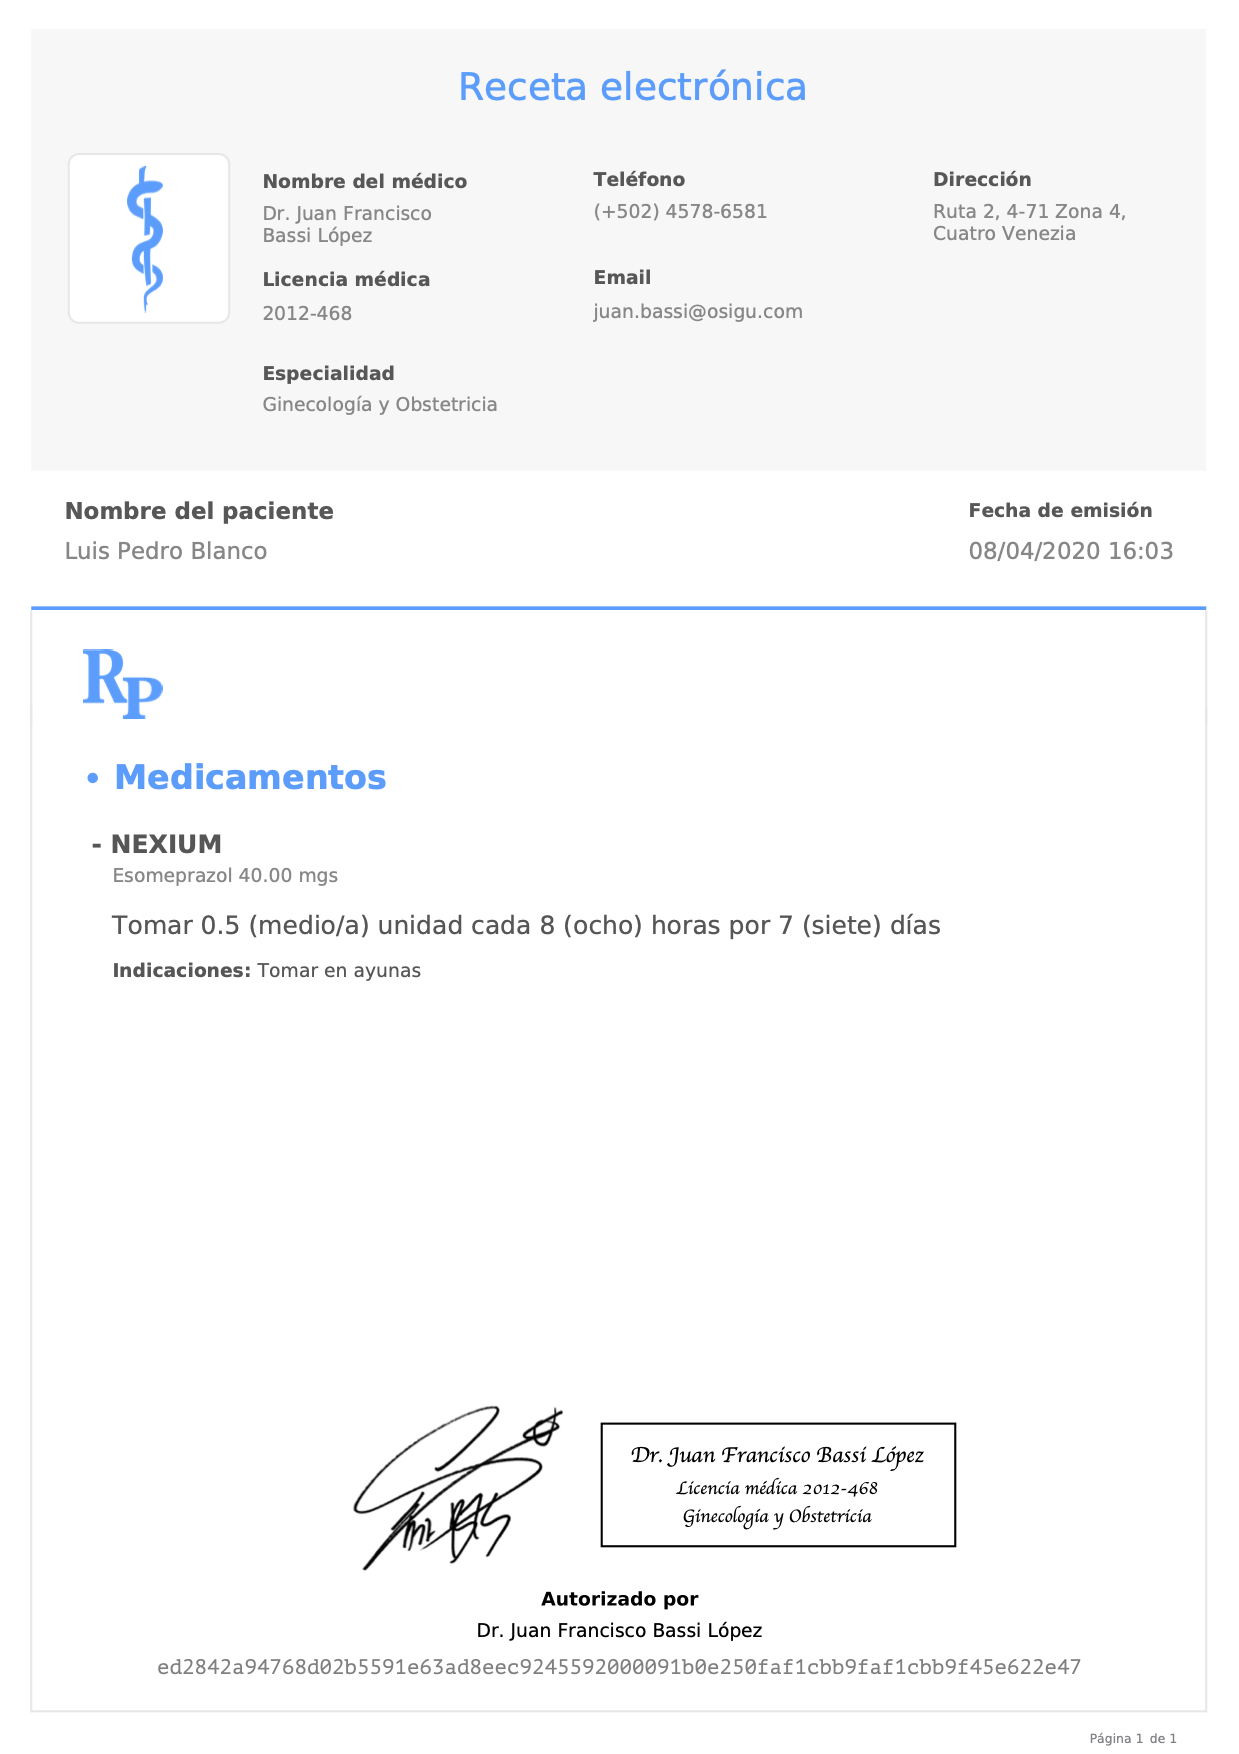
Once the doctor has filled in the information, they can preview their prescription and either send it via email or print it. Below is an example of the generated prescription:

Updated 8 months ago
